Friday, December 4, 2009

Fine Art Template


To create this look I first opened a new, white document in Photoshop. To this document, I added an additional layer. Within the additional layer I created 5 equal size rectangles, equal distance apart and each one black. Then, I sized my images to the same size as my white document and drug it on top of the document. I then created a clipping mask which "framed" the parts of the image within my original, black rectangles. Lastly, I added text. I think these fine art templates are sweet. I like my one of the fly on the flower best of these two. . . Yup. :)

Saturday, November 14, 2009

Photolusion Blend


Phtolusion Blend


Doorway; f3.0; 1/45; 11/13/09; Rexburg, ID; 3:20pm; Samsung L830
Building; f7.7; 1/500; 11/13/09; Rexburg, ID; 3:15pm; Samsung L830

So, I took these two images and then had to significantly shrink down the doorway image. I measured the doorway already in the building shot and tried to make my doorway about the same size. I then layered the images on top of one another in Photo Shop and added a mask to the doorway. I then painted out the parts of the image outside the doorway in my picture and wa-la! A doorway to nowhere.

Photolusion Strait


PumpkinHead; f3.0; 1/30; 11/13/09; 3:30pm; Rexburg, ID; Samsung L830

So, to take this image I held a little pumpkin in front of the camera at a distance appropriate to cover up my subject's real face. I figured that drawing a face on the pumpkin would be a nice touch. This pumpkin man has very large facial features :) I had to crop the top a tiny but to get the finger that were holding the pumpkin out of the shot.

Tuesday, November 10, 2009

Panoramic


I brought the images I took into PhotoShop and then used the photo-merge tool to "stitch" them together. I really think this option is awesome! After the images were brought together in one, I then cropped the image so that the noticible overlaps were eliminated. Lastly, I slightly addjusted the levels to help bring out the color and contrast. I wish the sky would have gotten more colorful that evening. . .

f4.2; 1/90; Nov5; 5pm; Rexburg, ID; Samasung L830

f4.2; 1/125; Nov 5; 5pm; Rexburg, ID; Samasung L830

f 4.2; 1/125; Nov 5; 5pm; Rexburg, ID; Samasung L830

f4.2; 1/125; Nov 5; 5pm; Rexburg, ID; Samasung L830

I took each of these images using a tripod. There were a couple additional pictures I took but ended up not using because the horizon was getting lower and lower in each image. . . I guess I still need more practice taking panoramic photos and using a tripod :)

Saturday, October 31, 2009

photo-journal editing


My template version

Original template provided in class

Templates are tricky, just because there is SO much going on. As you can tell by comparing the original to my version: I changed the background color, re-arranged the photos, and added a new text box for "2009." In order to insert my photos into the template I first had to play around with sizing my photos so that they would fit effectively into the frames. I then would drag my photo onto the template, above one of the frames. I could then create a clipping mask which placed my photo inside the frame.

photo-a-day


Sun.Cookies; 3.0; 1/10; 1:ooam; my apartment; SamsungL830

Sat.ScareCrow; 7/7; 1/180; 2:30pm; BYU-I campus; Samsung L830

Fri.Jack-o-Lantern; 4.6; 6s; 10:oopm; my apartment; Samsung L830

Thurs.Tree; 3.0; 1/45; 6:30pm; nature park; Samsung L830

Wed.Earrings; 3.0; 1/10; 11:50pm; my apartment; Samsung L830

Tues.Tractor; 3.0; 2s; 7:15pm; straw maze in Archer, ID; Samsung L830

Mon.Kyle; 3.0; 1/45; 10:00pm; BYU-I campus; Samsung L830

These pictures were taken each day of the week beginning Monday October 26th and ending Sunday November 1st. My favorites are the more Halloween-y themed pictures (the tractor, jack-o-lantern & scare crow). I wish I'd have had the foresight to take a Halloween themed photo each day. Oh well. My overall favorite is the jack-o-lantern. In photoshop I adjusted the levels/contrast on the photos of kyle, the earrings, the scare crow & the cookies.

Saturday, October 24, 2009

Portraits


Smelling Flowers; 10/23/09; 5:25pm; BYU-I Gardens; f3.8; 1/60; Samsung L830
On the Bridge; 10/23/09; 5:40pm: BYU-I Gardens; f3.8; 1/60; Samsung L830

My roommate was sweet enough to let me do a photo shoot of her in the gardens. All of the images of her were taken on the 'portrait' setting of my camera. In both of these images I just used photoshop to enhance the contrast and highlights. I really enjoyed taking pictures of her!!

Enhancing Portraits


1) Original; 10/23/09; f 3.0; 1/45; 5:30pm; BYU-I Gardens; Samsung L830
2) After Enhancements


1) Original; 10/23/09; 5:20pm; BYU-I Gardens; f3.0; 1/45; Samsung L830
2) After color match

For some reason I had it in my mind that editing photos of people was going to be much harder than editing other photos. It really wasn't that bad! The first photo I enhanced: I fixed the red eye, got a spot off her chin, took the leaf off her sweater, and whitened her teeth (though I don't see much of a difference here, I guess she didn't really need it!). For the second image I used the color match option and color matched it to the Portrait 1 image in the portrait section. In both images I adjusted the contrast and highlights.

Saturday, October 17, 2009

Editing w/Borders


Carriage photo; 10/07/09; f3.0; 1/60; Bannack, MT; Samsung L830

For this assignment I wanted to try the brushed-on effect. Originally, I amped up the levels of the image in photoshop. With my image, I then added a new layer and selected a reddish color from the carriage to fill the layer with. I also added a black layer mask to the image. I then was able to use a variety of thick, heavy brushes at different opacities in order to paint the image back on or paint the image away (using black and white paint colors on the mask layer). I then added text and chose the 'screen' blending mode for the text and also slightly reduced the opacity of the text. Overall, I like the way it turned out and think that it is pretty post-card-ish!

Night Shots of Light

Jack-o-lanterns; 10/15/09; f3; 1s; 9:30pm; Rexburg, ID; Samsung L830

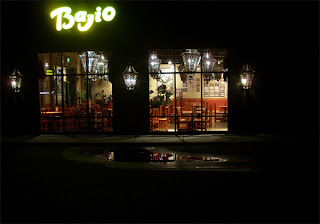
Bajio; 10/15/09; 10pm;Rexburg, ID; f7.7; 3s; Samsung L830

I actually found it quite fun to take pictures of light. I didn't have much success getting shots of light in motion/painting with light that I liked but I think these two turned out pretty okay. I especially like the Bajio picture - the lantern-type lights there are really cool! Neither of these shots were touched up in photoshop. I did crop a little to the left of the Bajio photo however. For the Bajio picture I placed the camera on top of the car and used a timer to ensure the camera stayed still for 3 seconds.


Saturday, October 10, 2009

Bannack Ghost Town


The Town; 10/07/09; Bannack, Montana; f5.6; 1/500; Samsung L830
Wheels; 10/07/09; Bannack, Montana; Sony Cyber Shot DSC-H1
Ghost Door; 10/07/09; Bannack, Montana; Sony Cyber Shot DSC-H1


Window Reflection; 10/07/09; Bannack, Montana; f7.7; 1/60; Samsung L830
Rusty Can; 10/07/09; Bannack, Montana; f3.0; 1/125; Samsung L830
Carriage; 10/07/09; Bannack, Montana; f3.0; 1/60; Samsung L830


Broken Glass; 10/07/09; Bannack, Montana; f7.7; 1/60; Samsung L830; macro
Weeds & School House; 10/07/09; Bannack, Montana; f7.7; 1/125; Samsung L830; macro
Ghosts; 10/07/09; Bannack, Montana; f7.7, 8s; Samsung L830
Portrait; 10/07/09; Bannack, Montana; f3.8; 1/125; Samsung L830

We spent all day taking pictures in the gost town of Bannack, Montana! What an adventure it was!! I had a hard time narrowing my photos down to the ones that I most wanted to share from this trip. Overall, I feel like I really came to understand how to better use my cameras different settings. I learned how to use the manual setting in order to take the Ghost picture. I practiced more with the macro setting to archive shallow depth of field. I used the portrait setting and learned about what makes for good light in a portrait photo. I think what I like most overall in these photos is the deep red color which is so abundant throughout the old town!

HDR


Underexposed; 10/07/09; Bannack, Montana; f3.0; 1/90; Samsung L830; tripod
Normal; 10/07/09; Bannack, Montana; f7.7; 1/180; Samsung L830; tripod
Overexposed; 10/07/09; Bannack, Montana; f7.7; 1/750; Samsung L830; tripod


HDR Blend

These 3 images were taken at -2, 0, and +2 exposure settings. Each image was taken successively from a tripod so that the photos, except for their exposure, would be exactly the same. The images were then blended into one. I almost feel like the final, blended image would have turned out better without the negative exposure picture being included. . . Like the final photo is a little too light. I guess I just need to practice more taking and blending of images for HDR! :)

Friday, October 2, 2009

Plants & Animals


Flowers & Sky; 10/02/09; 4:40pm; Rexburg, ID; f7.7; 1/250; Samsung L830
Ducks; 10/02/09; 4:30pm; Rexburg, ID; f4.2; 1/250; Samsung L830

Flowers & Fly; 10/02/09; Rexburg, ID; 5:30pm; f7.7; 1/125; macro; Samsung L830
Flowers & Fence; 10/02/09; Rexburg, ID; 4:40pm; f7.7; 1/180; Samsung L830

These were fun pictures to get out there and take! It is hard to photograph animals though, that is for sure! The duck picture I posted is the one I thouht turned out best . . . I don't feel like it follows the 'rule of thirds' perfectly though but I do think it give the main duck a good amount of lead room to move into. . . .? I really like how beautiful the sky was for the one shot. And for the yellow plant picture . . . I couldn't believe I got the fly so nicely lined up!! For each one of these pictures I tweaked the levels/contrast slightly in photoshop.


Fliters & Adjustment Layers


Original
FlowerVase; 10/02/09; 4:00pm; Rexburg, Kitchen; f3.0; 1/8; Samsung L830


1- Adjustment Layer 2- Smart Filter

I really enjoyed editing with the adjustment layers! First I added a 'levels' adjustment layer. I then used the 'multiply' blending mode to darken the image. Using the paitbrush tool I took the effect off of the blossom and the one middle leaf which you can tell is significantly lighter. For the smart filter image, I first converted the picture to a smart image. I then added the colored pencil filter to the image. I went back in to the image and lessened/took of the filter around the flower and vase! These were both fun to make!